How to Create a Gallery Wall
Hanging pictures, especially in a grouping, can be a real challenge. There is nothing more frustrating than trying to hang multiple pictures to create a gallery wall and have them look good without hanging and re-hanging pictures. How many times have you had to make multiple nail holes and ended up with a wall that looks more like Swiss cheese than a beautiful art gallery?
Today I have the answer for you. Here is a quicker, easier way to create a great looking gallery wall, whether you are hanging photographs or other artwork. I will show you how to make a gallery without any extra nail holes–and you’ll know what the finished gallery will look like before you ever pick up a hammer.
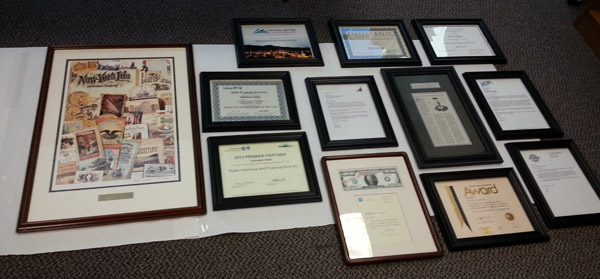
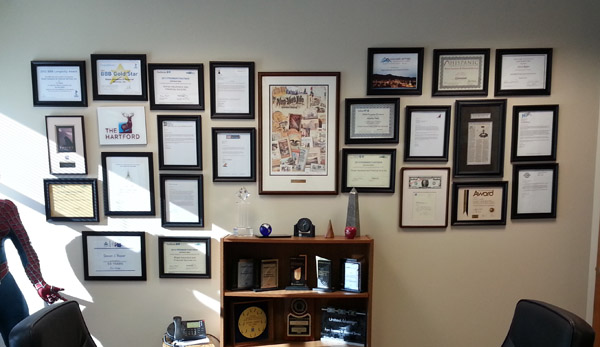
First, measure to determine your wall space. Take into account any furniture or other decor that will sit against the wall, such as bookshelves, sofa, tables, plants, etc. Next, gather all your gallery images. The pictures in my tutorial were taken as I created a gallery for a business conference room so they are all awards and letters. Your gallery might be photographs, paintings or other artwork.
Decide what kind of frames you want. For this gallery, we picked a single frame style wherever possible. Using like frames gives your gallery a cohesive look and puts more focus on the artwork. You can also create a gallery with a variety of frames.
Frame everything before you start. You want to see the completed product before you hang any pictures and getting the spacing right is going to require finished artwork–meaning framed or as it will be once you hang it on the wall.

After your pictures are framed, you need to gather your supplies. You will need newspaper or butcher paper, tape (I like blue painter’s tape), a marker, a yardstick or measuring tape, a level, a hammer and picture hangers. These little gold ones are my favorite. They come in different sizes and you can get them at most hardware stores.
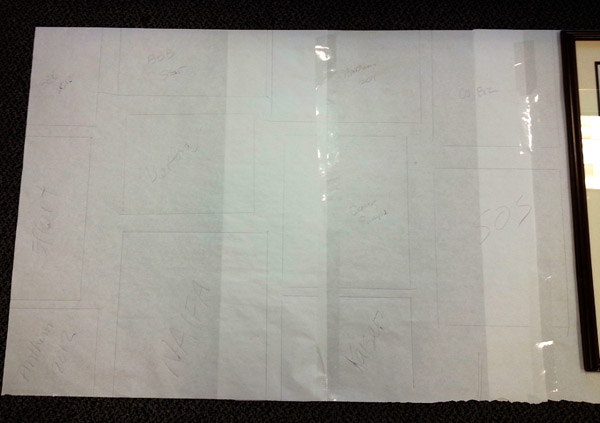
Measure your gallery area. Lay out your paper on the floor in the same dimensions as your gallery. I recommend marking the vertical center of your gallery to help in hanging it later. Tape the sheets of paper together to keep them aligned. Once your paper is set, arrange your artwork on the paper as you would like it on the wall.
When you are satisfied with your layout, trace the outline of each frame on the paper. As you remove each frame, label each space so you can remember where it goes once you hang the gallery. You can do this by writing a description of the artwork inside the outline or you can number your frames (I write numbers on the back) and number the corresponding outline on your paper. Also, measure the hanger spot on each frame and mark it on the outline so you can properly place your hangers. Your finished layout should look more or less like this.
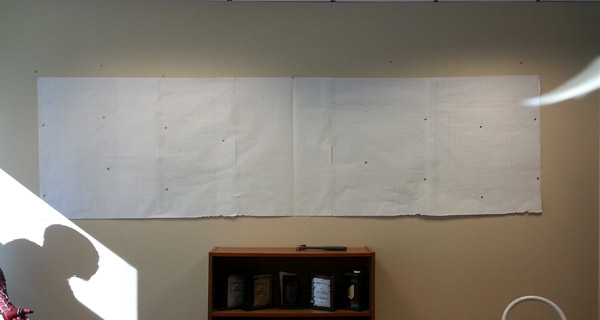
Once you have outlined, labeled and marked each frame, set the frames aside and tape your paper to the wall. If you have previously marked the center and end spots of your gallery on the wall, line these up, making sure it’s level.
Using the hanger marks from each image, hammer a hanger over each hanger mark. Once you’ve hammered in all the hangers, carefully remove the paper. I usually end up with a little circle of paper behind each hanger, but since they are hidden behind the frames, it doesn’t bother me.
Use your paper as a guide to hang all your images in their corresponding places. And then step back and admire your handiwork. A completed and well-hung gallery wall with no extra nail holes and no Swiss cheese wall.
This hanging method works with any type of artwork, whether it is documents, photographs, paintings or other art. I would love to know how this works for you. And if you have any other tips for hanging artwork, please share them in the comment section below.


2 Comments